
Table of Contents
If you’ve read any of my other articles, it’s pretty obvious that I’m obsessed with design, performance, and iterative A/B testing.
For the past year, I’ve taken a deep dive into server-side split testing, and I’ll be honest, the obsession is real. A server-side split test is an A/B testing technique where the changes and traffic allocations of any given test take place at the server level before the web page is delivered to the browser.
What makes this approach attractive are the huge performance gains and the user experience improvements when implemented correctly. Below I’ll run you through some of my findings as well as how to go about setting up your own testing stack.
(Looking for more on A/B testing? Here’s an article I wrote recently on what I’ve learned throughout my years of A/B testing.)
The Problem with Client-Side Split Testing
Traditional client-side A/B testing works by including a snippet of JS at the head of your website. This snippet is supposed to load before anything else on the page does in order to carry out the correct DOM changes of the test at hand.
I have two major issues with this:
- The entire library of third-party JS is supposed to load before the changes of your test take place, which causes page elements to “blink” and jump around while the rest of the test loads. You can always block the page from displaying before the respective client-side JS snippet is loaded to avoid the blink, but this adds 2 to 3 seconds of load time to your page. I’ve seen cases where website traffic has tanked due to the misuse of this — so don’t do it.
- The original version of the page and its respective assets will always load. That’s right, if you’re testing removing images from a blog post, these images will always load on the variation where you’ve removed them (given the scenario that you’re removing and not adding them).
Here’s what happens when I set up a client-side test to remove all images from one of my articles:
As you can see, for a brief moment, before the test’s JS loads, the images are visible to the user. This doesn’t bother me due to my OCD regarding aesthetics — this bothers me because it directly affects the results of tests (but the OCD part plays a big role). In this situation, the user’s focus will now be on “Where did the image go?” and most likely dismissing the page as broken once they’re unable to locate it.
How Server-Side Split Testing Solves This
The difference between server-side and client side split-testing is where the changes take place and the performance effect it has on the end user. Instead of downloading all assets and changing the layout on page load, a server-side test makes the changes at the server level before the assets get downloaded by the user. This means that two or more versions of that page exist at the server level but the user will only get served one without the overhead of the rest — huge performance gains.
Here’s the same A/B test but now taking the server-side approach:
The content stayed in place without any notice to the end user of their participation in a split test. Not only is the content not having a dance party, the images being removed are not being loaded by the browser — this decreased load time, on average, by 30%.
So now that we know that server-side split testing kicks butt, I’m going to run you through how I setup the low cost testing stack for this site by splitting traffic through Netlify and tracking test results in Google Optimize with the help of the Google Tag Manager Data Layer.
Splitting Traffic at the Server Level
You’re going to need a way of splitting traffic at the server level. Personally, I have zero familiarity with configuring servers, and it’s not really where I want to spend my time. I’ve been hosting my website on Netlify for about a year now, and they take care of all the complicated server-side configurations, allowing me to split traffic to different versions of my website via Git branches. If you know how to use Git, this will be second nature to you.
(For those that do like to get into the weeds with AWS: A/B testing on AWS CloudFront with Lambda@Edge)
Once you’re up and running with Netlify and you’re deploying via Git, navigate over to the split testing page from the admin’s main nav. You’ll get prompted to activate split testing. Click “activate.” Once activated, you’ll be presented with the controls for your split test.
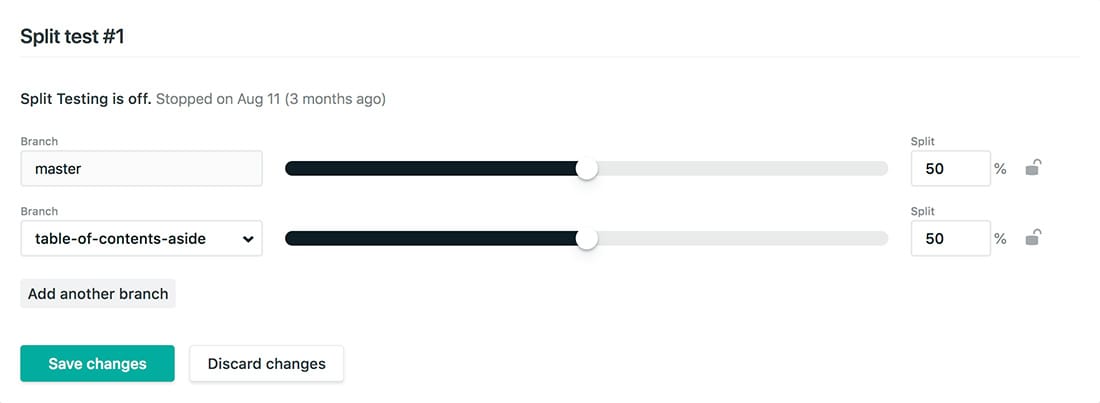
If you’re not seeing any of your other branches here or you’re getting the “This feature requires a repository with at least 2 branches” error, check your Build & Deploy settings and make sure that branch deploys are set to all.
Pick your branches that you want to test against, set the amount of traffic you want to send to each branch, and start your test. All traffic to your website is now being split into the branches you’ve chosen. Boom — you’re set. Now we need to figure out how to track how each variation performs.
Tracking Experiment Results
In order to track how each variation performs, we’ll need to choose a application that provides an intuitive dashboard with the ability to determine statistically significant winners. Most client-side A/B testing vendors provide the functionality to track server-side tests, but for this example we’ll be focusing on Google Optimize. If you’re not familiar with Google Optimize, this is an in-depth article with everything you need to know.
Creating an A/B test in Google Optimize
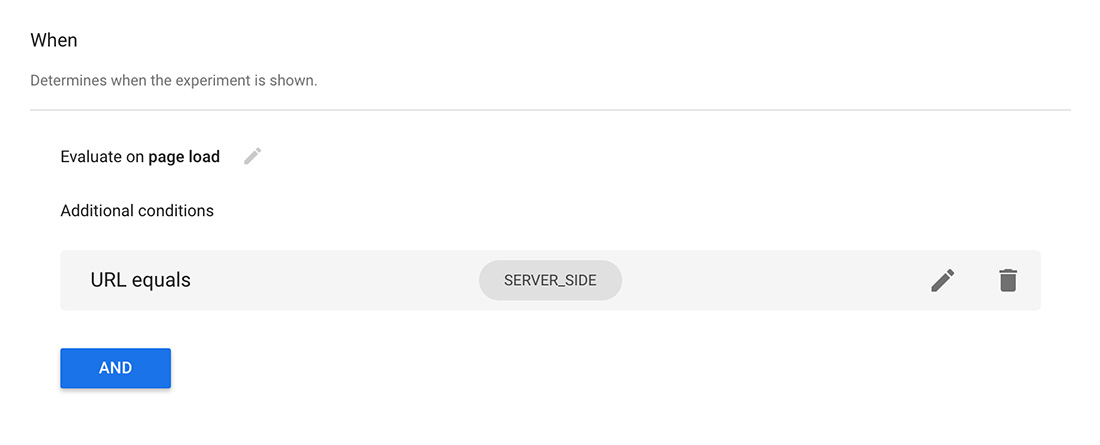
Once you have Google Optimize on your website or PWA, create an “A/B test” that mirrors that variations you have running on the server-side. The test can be created as a regular A/B test with the only discrepancy being under “Targeting,” where you’re going to create a rule of URL equals = SERVER_SIDE (what tells Google Optimize that this will be a server-side test).
Cool, we now have an A/B test running on Google Optimize and traffic being split at the server level — the next step is the connect the two.
Connect Variations via Google Tag Manager's Data Layer
In order to make a direct connection between the variations we set up in Google Optimize and the branch variations we’re splitting traffic to at the server level, we’ll need to add the unique experiment ID and the respective variation ID provided by Google Optimize to each branch variation using Google Tag Manager’s Data Layer.
In Google Tag Manager, navigate over to your Google Analytics tag and under “More Settings > Fields to Set” add the following two fields:
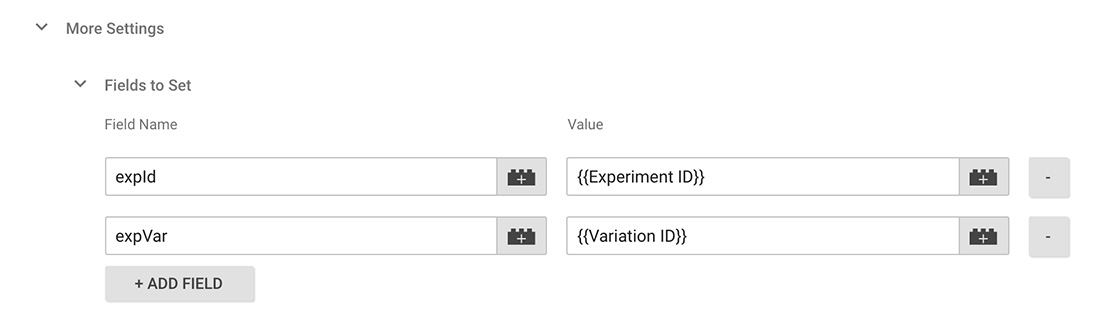
You’ll be able to obtain the experiment ID from the info column in Google Optimize once you publish the experiment — it’ll look something along the lines of OX7o3nkrR-ChTxqNJMA1nw.
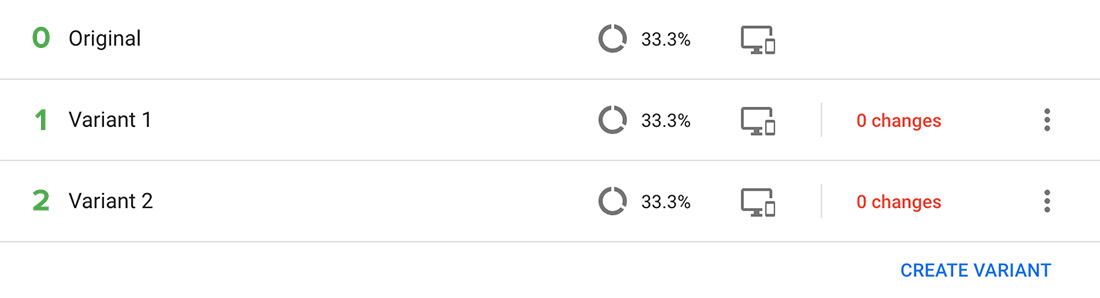
You won’t be able to easily find the variation ID, but there’s a numeric value assigned to each variation created starting at 0 for the original variation and increases by 1 for subsequent variations as illustrated below.
Fire up your code editor and, above your Google Tag Manager Script, add the values to the respective branches:
dataLayer = [{
     'experimentId': 'experimentidgoeshere',
     'variationId': 'variationidgoeshere'
  }];
Triple check that this is placed before your GTM script and not after — placing it after will disable your entire tracking GTM script for whatever no-so-obvious reason (not cool Google).
In Conclusion
Between server-side and client-side, which approach should you stick with?
Both, really. With server-side testing being the clear winner on the performance side, client-side testing still is and will continue to be the preferred approach due to the ease of setup. It only takes me a few minutes to open up Optimizely and create a test changing the home page h1 of Thomasnet.com. Not only am I able to efficiently do this but so can anyone else in the organization without taking up engineering hours.
Let’s face it, the reality is that engineers are a limited resource, and being able to empower non-engineers with tools to automate some processes and save on engineering time will still be the preferred approach. (In an ideal world, everyone could code as well as they can write — but we’re not there yet.) This means most surface-level UI and messaging experiments should still be created on the client-side while leaving server-side testing for deeper experiments such as product features, search algorithms, etc.
Add server-side testing to your optimization tool belt, build some cool tests, and let me know about it.
Resources
- Should you run experimentation client-side or server-side?
- Server-Side Vs. Client-Side A/B Testing Tools: What’s The Difference?
- Running a Server-side Experiment
- Split Testing on Netlify
- The Beginner’s Guide to Google Optimize
- A Step-by-Step Guide: Deploying on Netlify
- A/B testing on AWS CloudFront with Lambda@Edge
- GoodIU.org — Well curated list of A/B testing patterns for both client and server-side.

I'm Julian, a product design leader and developer with a habit for experimenting (I did some cool stuff at Thomasnet.com). I mostly write about what I'm working on related to product design, front-end development, and experimentation.
While you're here, I'm currently in the market for a design leadership gig. If you're interested in working together, hit me up, or feel free to share my resume.
Notes From the Field

Designing Multi-Sided Platforms
A comprehensive guide on designing the experience and growing the engagement of networked markets.

A Pragmatic Approach to Design Principles
How we took our design culture from executive-centric to user-centric with the help of pragmatic design principles.

Server-Side Split Testing for Static Websites
When to use, when to avoid, and setting up your A/B testing stack.

How We Adopted CSS Grid at Scale
From team buy-in to fallbacks, here's the approach we took at Thomas with the implementation of CSS Grid.

Don't Fight The Notch — Designing for the iPhone X
Coming to terms with the notch on the iPhone X and its effect on mobile design.

Lessons Learned After Running 300 A/B Tests on 20 Different Websites
Over the past 2 years I’ve dedicated part of my career to building a conversion rate optimization (CRO) team from the ground up. Here's what I've learned.